|
[?]Subscribe To This Site
|
How to Build Roof TrussesIn this page, we are going to discuss the process of how to build roof trusses. One way to make this process of building roof trusses easier is to start with a detailed sketch of the truss you are constructing. Detailed sketch means the truss needs to be drawn to scale showing dimensions and angles of the joints. The sketch of the simple roof truss shown below is a detailed sketch to illustrate the importance of working with detailed plans which will make the process of seeing your ideas clearer but it will also helps with material planning as you decide on type and quantities to bused. Remember a sketch will not only help with the design but it is the quickest and least expensive way to see your ideas without building an actual truss only to change your mind later. This sketch was intended for timber roof trusses that can be built on site. The installation or Setting roof trusses such as this are very simple and it can be done without the need for a crane or boom truck to lift the trusses in place.
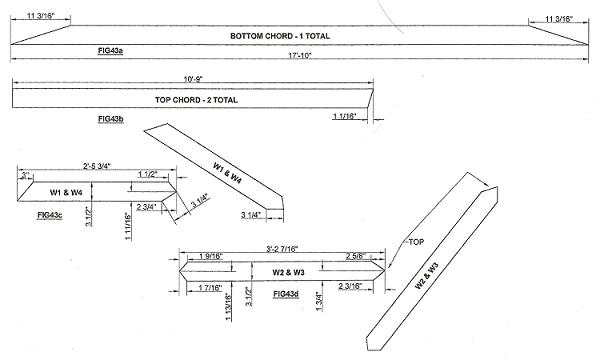
Fig43 below is the best way for the process of how to build roof trusses because it shows members in details, the lengths, the angles by which each side is to be cut to fit and and to make up the overall angle or slope of the truss as a whole. This truss is 3:12 slope as you can see a 4 or 5:12 slope will require more materials than is shown here. The angles of the joints are required not only for truss construction but truss calculations as well. The member names W1 thru W4 are numbered from left to right. W1 and W4 are equal and opposite, likewise members W2 & W3. Fig43a is the bottom chord member that is 17'-10" long. As shown both ends of this piece needs to be trimmed to allow the top chord pass thru uninterrupted making the overall truss slope. A 17'-10" long piece of lumber will require to be spliced, the location of such splice can be anywhere as long as it does not align with joint location.
Fig43c is the web member. Since this simple truss is symmetric about the center, it means that every member on the left of the center will be identical to the members on the right. This particular piece is 2'-5 3/4" long. Again using two pieces on top of each and make the necessary cuts shown in the detail will yield the two pieces needed for the job. Fig43d are the two pieces directly below the truss peak, closest to the middle of the truss which is 3'-2 7/8" long. All the dimensions needed to trim the ends are shown in the detailed sketch. The process of how to build roof trusses is challenging to be done in the field because there is no way of measuring the joint forces. One way of getting around this issue is to use truss connection plates with know capacities. Such manufacturers as Simpson Strong Tie have a lot of connection plates that show the amount of forces they can carry. Installing these types of connection plates at the joints using the manufacturer recommendations for types of nails will get you the desired results. for more information about truss calculation click here or truss design here Back to how to build roof trusses |
|


